Let's give you a little background on this piece. My husband and cousin pulled up in my yard the other day with this desk they found in the trash. They asked me if I wanted to keep it... Really?! I'm the Queen of recycled trash craft projects... well right now I'm more of a Duchess but I'm working my way up there. None-the-less, as soon as I saw it I knew exactly what I wanted to do with it. I immediately grabbed a few photos to determine how many I would need to completely cover it. Then off I went to raid my hard drive for all the good photos, transferred them to black and whites, uploaded them to Walmart online for a 1-hour development and 40 minutes later I was checking out with 153 pictures, spray adhesive and a can of clear acrylic sealer. So enough rambling, here's how I did it...
What You Need:
Desk or other surface
Elmer's Spray Adhesive (#1 product of this kind, trust me)
Mod Podge Clear Acrylic Sealer
A Ton of Photos
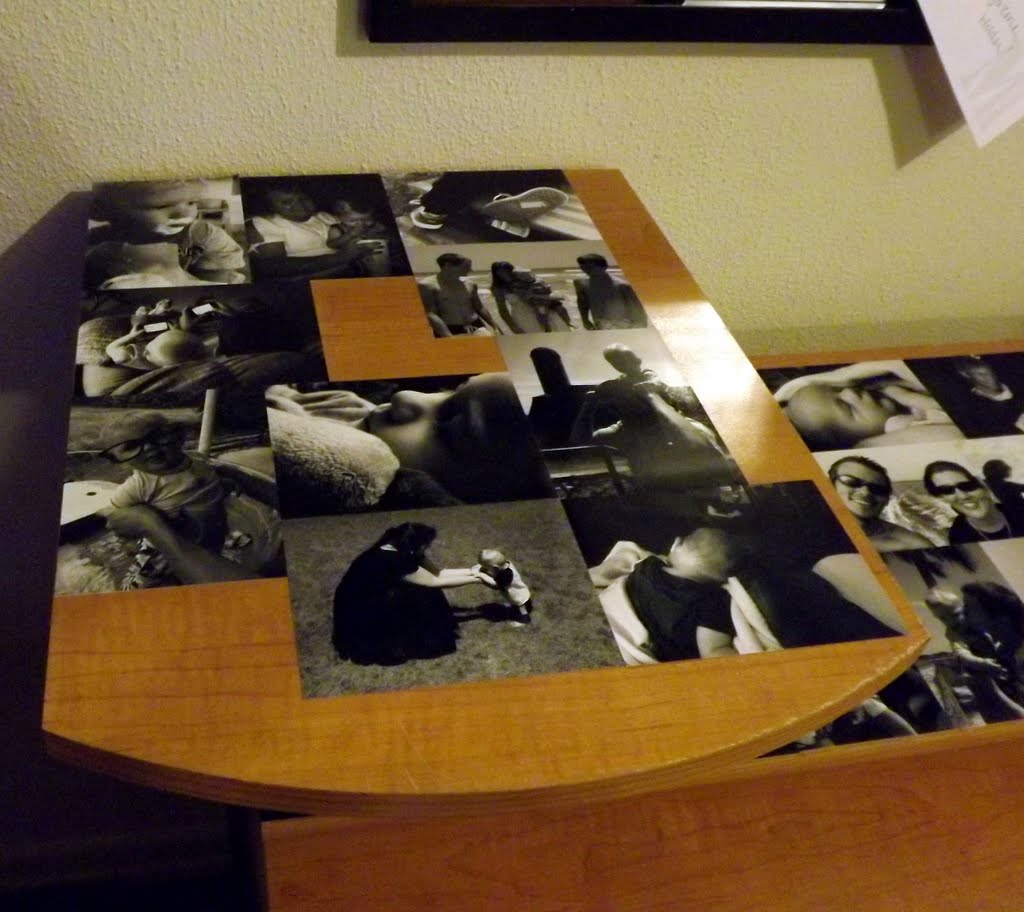
First off, clean the surface you are working with. If you don't you will regret it later. When I started this project I just sprayed the surface and threw a few photos down always starting each row on the left side. (see above.) My recommendation would be to alternate which side you start the row on. It makes it look evenly spaced.
Also, when picking out your photos keep in mind the orientation of the pictures. I didn't think of it when I started this but thankfully I had enough extra pictures to compensate for the odd spaces. I was able to keep a clear system on the main surfaces so I only had two odd orientation incidents :)
Throw down as many whole pictures as you can before worrying about the one's you have to cut to size. It makes the project a lot easier to get through, trust me.
This is the spray I used in case you were wondering. During my research I found that Elmer's and Mod Podge were the most highly recommended products of this kind. And I had experience with off brand spray adhesives, Elmer's was definitely a win for me. The Mod Podge sealer I never had experience with but it seemed to do it's job well.

Another tip. When I started I originally just sprayed the surface down as a whole and slapped pictures on it. Once I got more into it I found that spraying each photo individually worked much better for me. But you will get sticky hands very easily doing it this way so make sure you have something on hand to remove it if you're like me and OCD. Lol. I didn't so I just wiped my hands on my jeans so it grabbed some lint and kept me from sticking to everything. This stuff is INSANELY STICKY!! Also, you'll notice the black tray I'm using to spray on might look a little familiar. That's because it's a meat tray. If you're a big fan of TV dinners and fast food restaurants you may not recognize these unless you work as a butcher. This tray is what is the meat is put on and wrapped in when you buy it at the store. I have been saving these for use a craft trays. They are perfect and of course they're disposable :)

Once you get all the whole photos down that you can begin to lay out the pictures you want in the gaps. There will be "slivers" of open space. Don't worry about those yet. You can fill those in with the scraps left from cutting the current batch of pictures. After laying them out I found it was helpful to hold the picture in place and bend it over the edge of the table to create a crease that is easy to follow. Cut away and glue down your work...
If everything is done right then you are left with a lot of clean edges and precious memories.
When everything is done follow the directions on the back of the Acrylic Sealer and spray away. I did about 5 coats.
An extra step I did later involved the regular Mod Podge glue. I noticed some of my pictures on the edge of the desk weren't completely flush. Instead of tearing it up and respraying and making another mess I just gobbed Mod Podge in those places... and everywhere else basically :) It dries clear and you can't tell it's there. When its dry you can run your finger over the corners of your desk and it will feel completely smooth and tangle free. Your pictures won't budge!
-----------------------------------------------------------------
If you liked this post click the "Follow" link on the left side of the top bar. Note: If you have a pop-up blocker enabled it may prevent you from following me until you temporarily disable it. You only have to disable it once.